Screen Capture with iShot Pro

Category : Knowledge Share

With iShot Pro you have multiple options to take and use screenshots. This is particularly valuable for the design and development teams with such features as pinning the screenshot, annotating, and selecting features like copying colors or sizes.

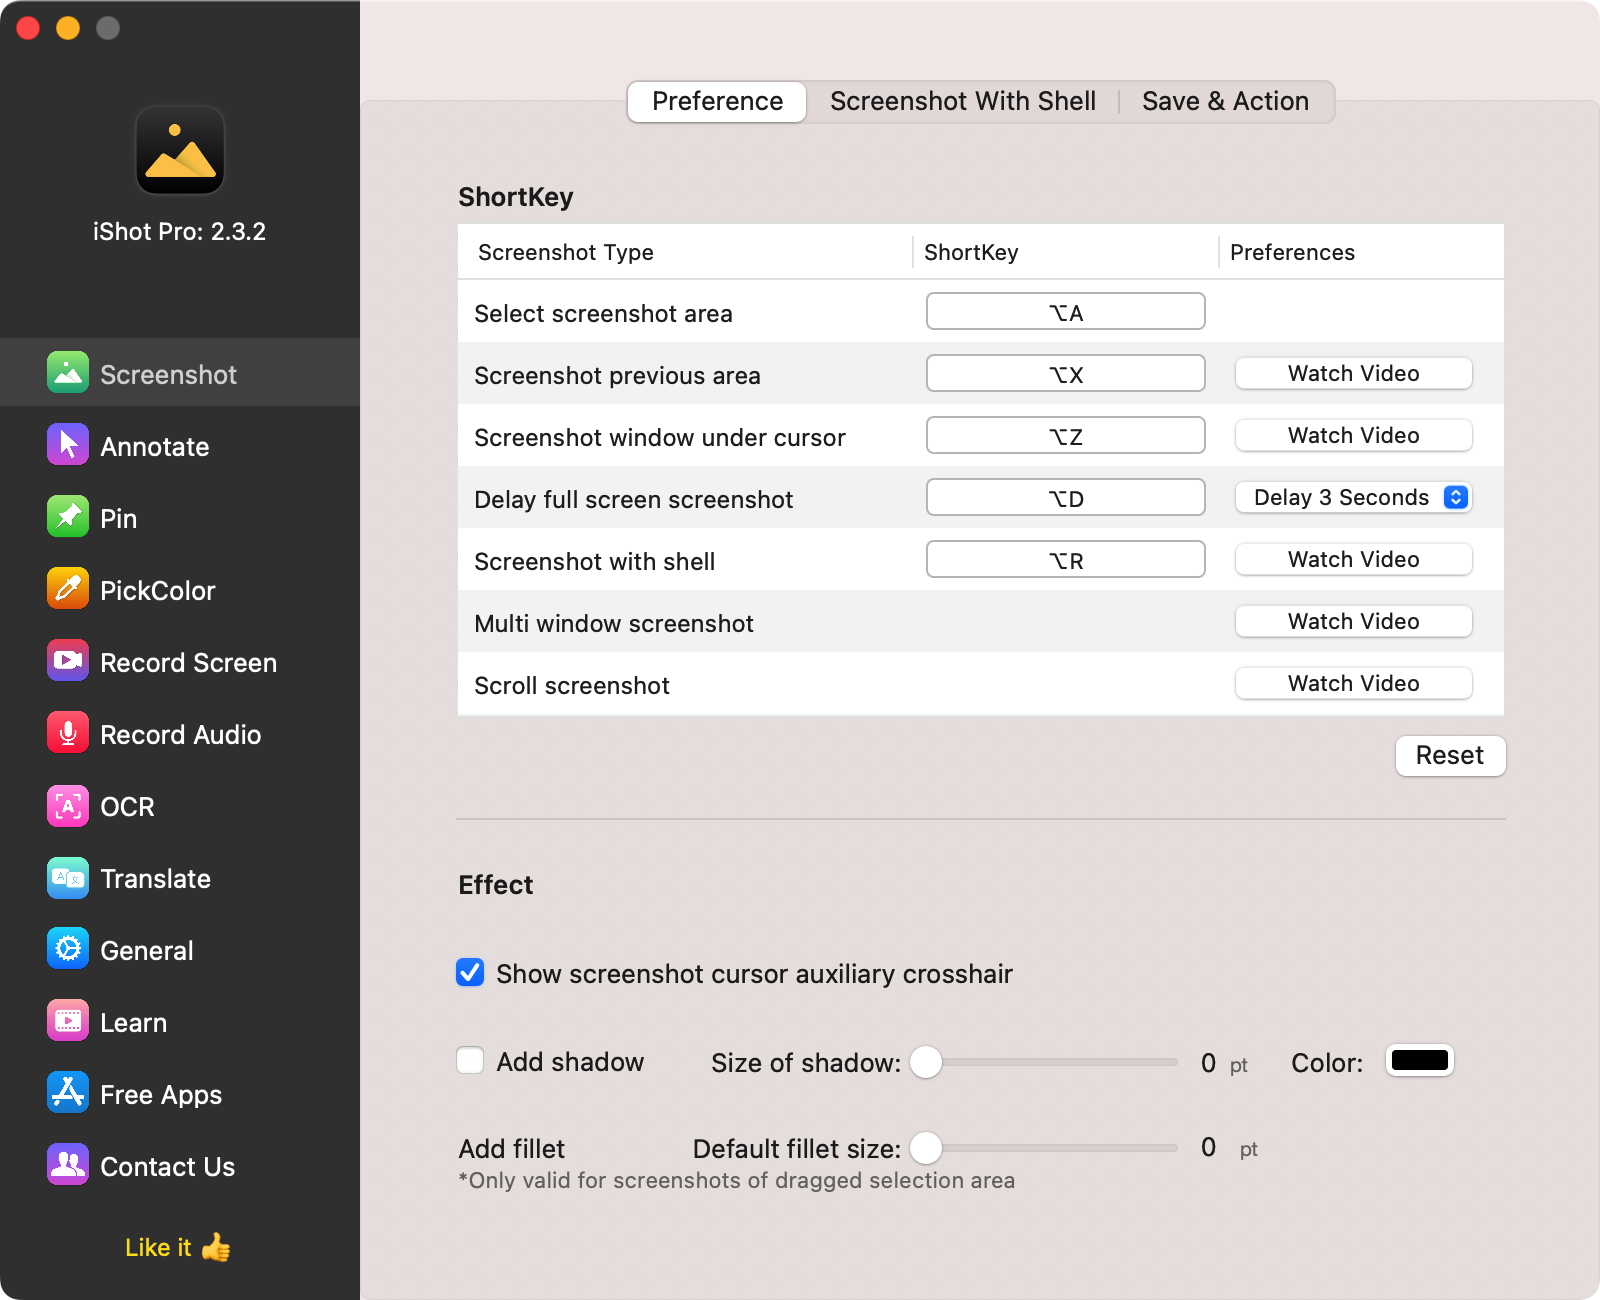
Here we will briefly examine some of the tools iShot Pro provides!

Size Option

We can use the size option in iShot Pro to check the appropriate size of an image. For example, you can select an image and if we need to ask a client for an image of a certain size, you can say that ii couldn’t be smaller (or larger!) than 800 x 500 px.

Copy Color with RGB & HEX

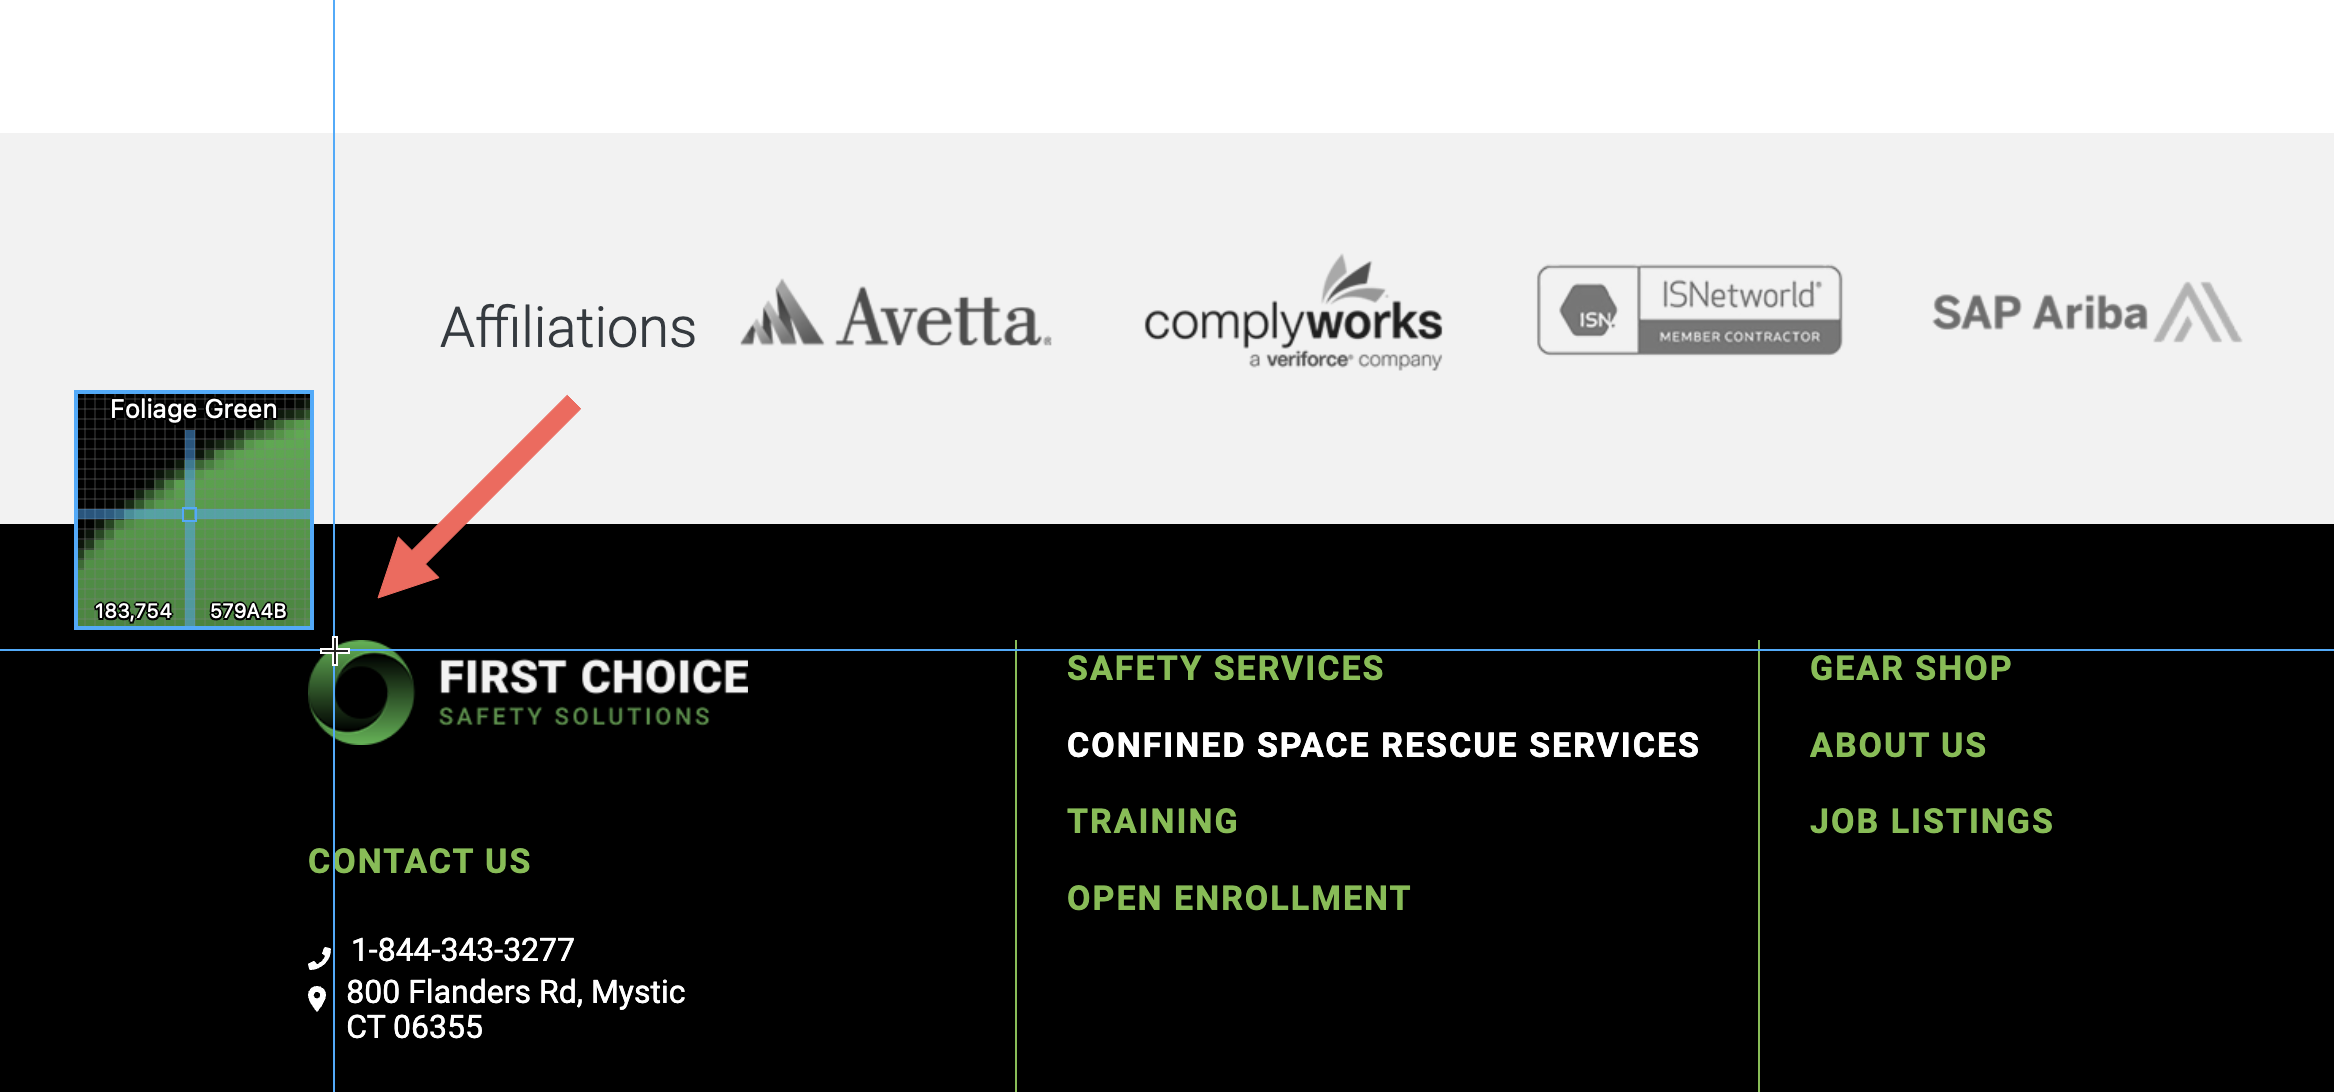
If you select “r” for RGB or “x” for HEX, the color code for where your cursor landed is now copied in your clipboard! You can use the individual colors to match appropriately for branding and design.

Copy Text from Images – OCR Option

This option in iShot Pro allows you to copy text directly from an image. Select the image area that includes the text you want and iShot Pro will run a recognition for text within that selection. It also allows you to edit the recognition for any mistakes or missed words.
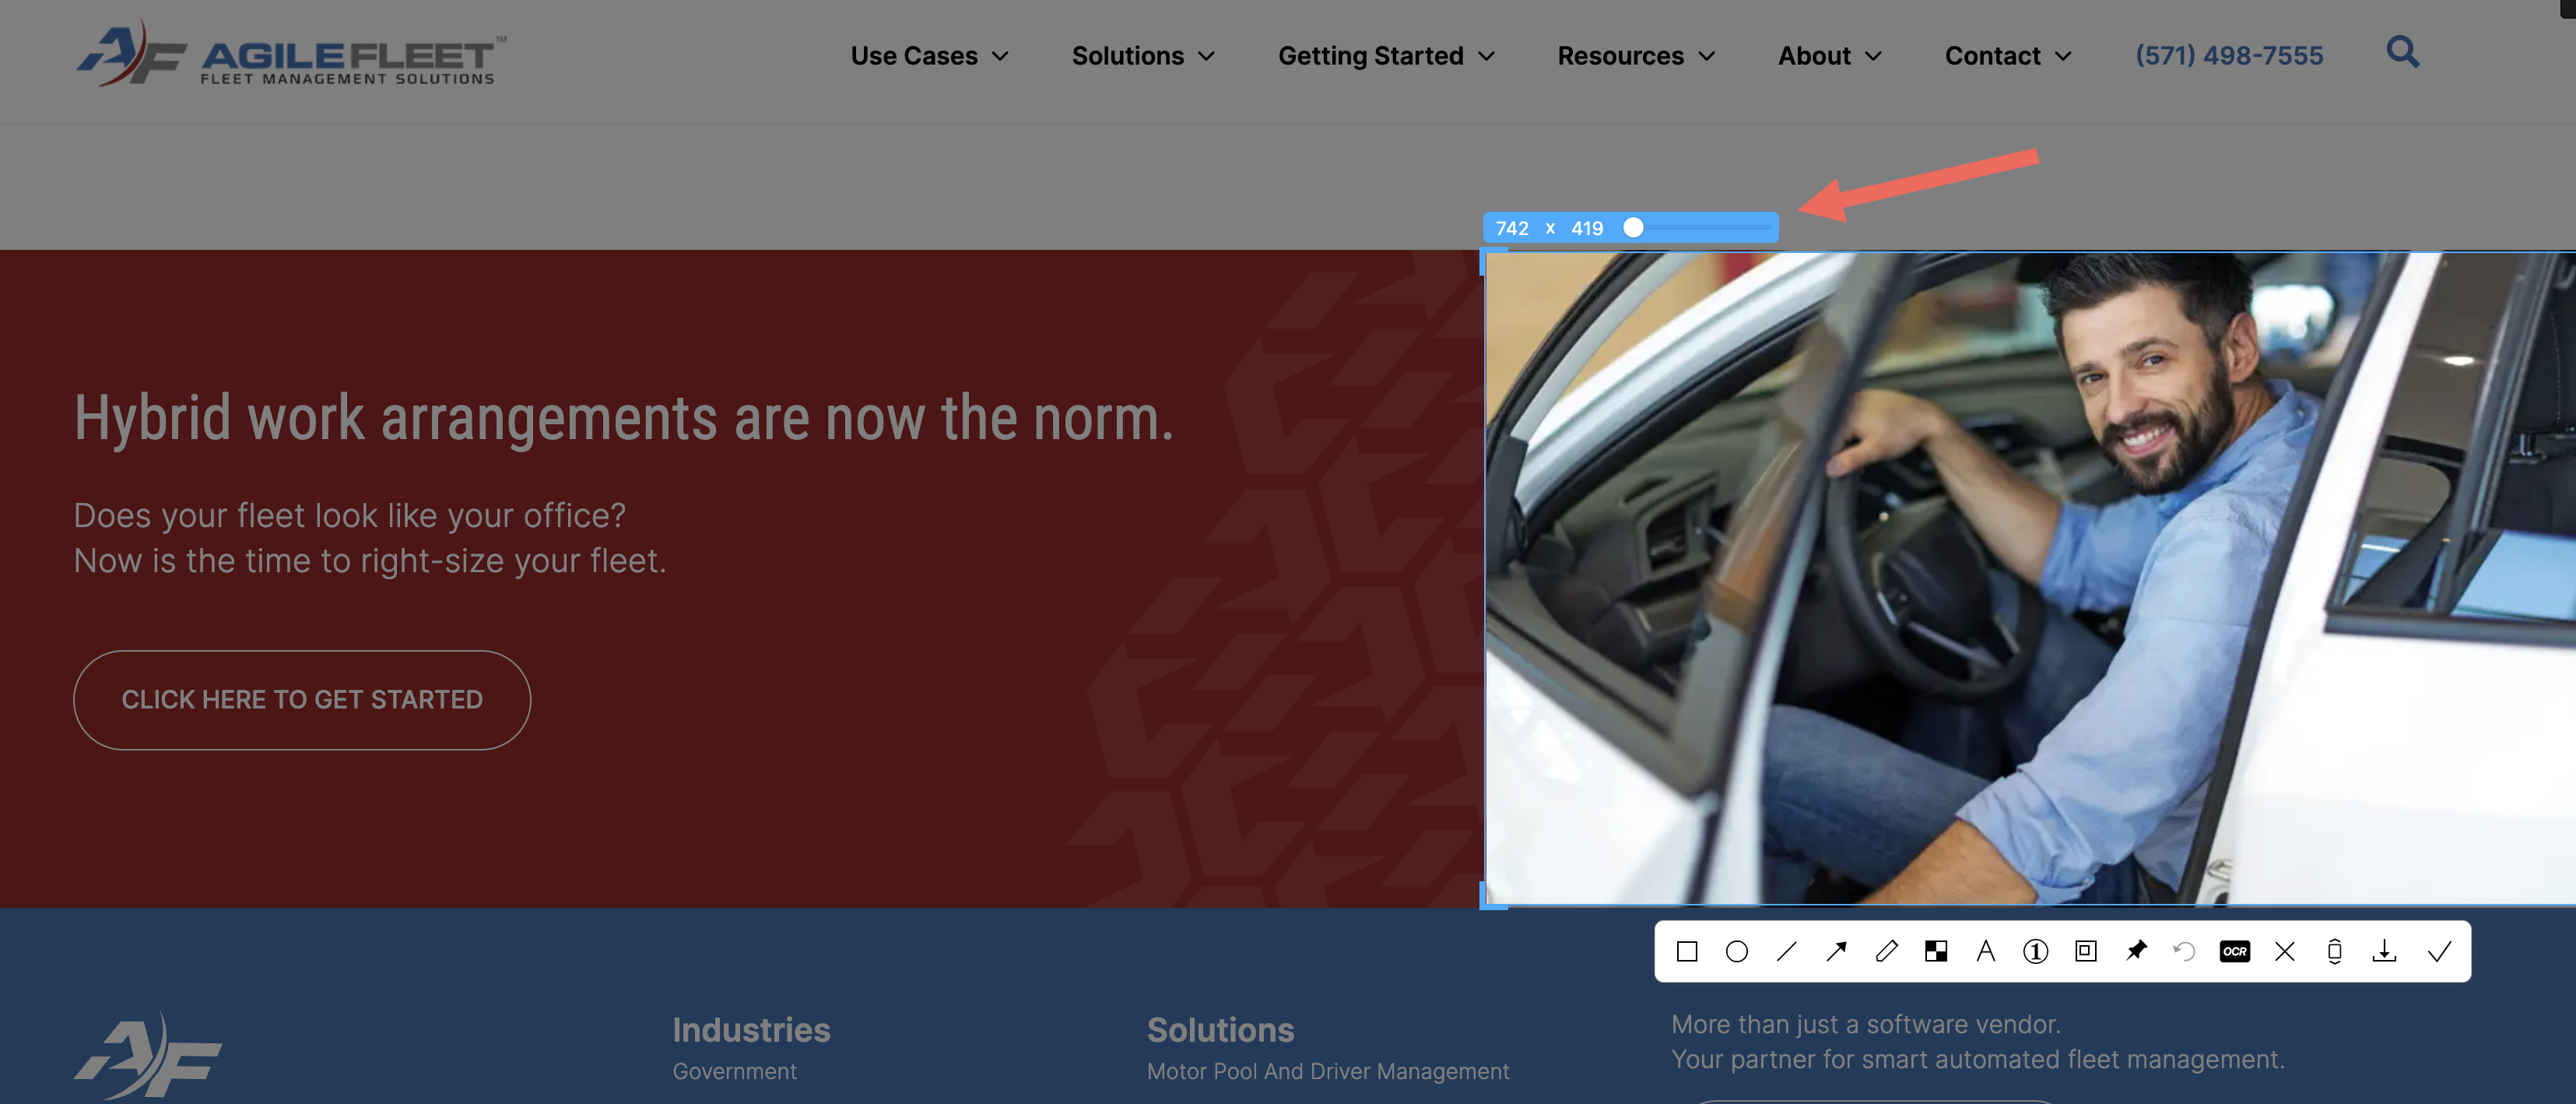
Highlight a Section

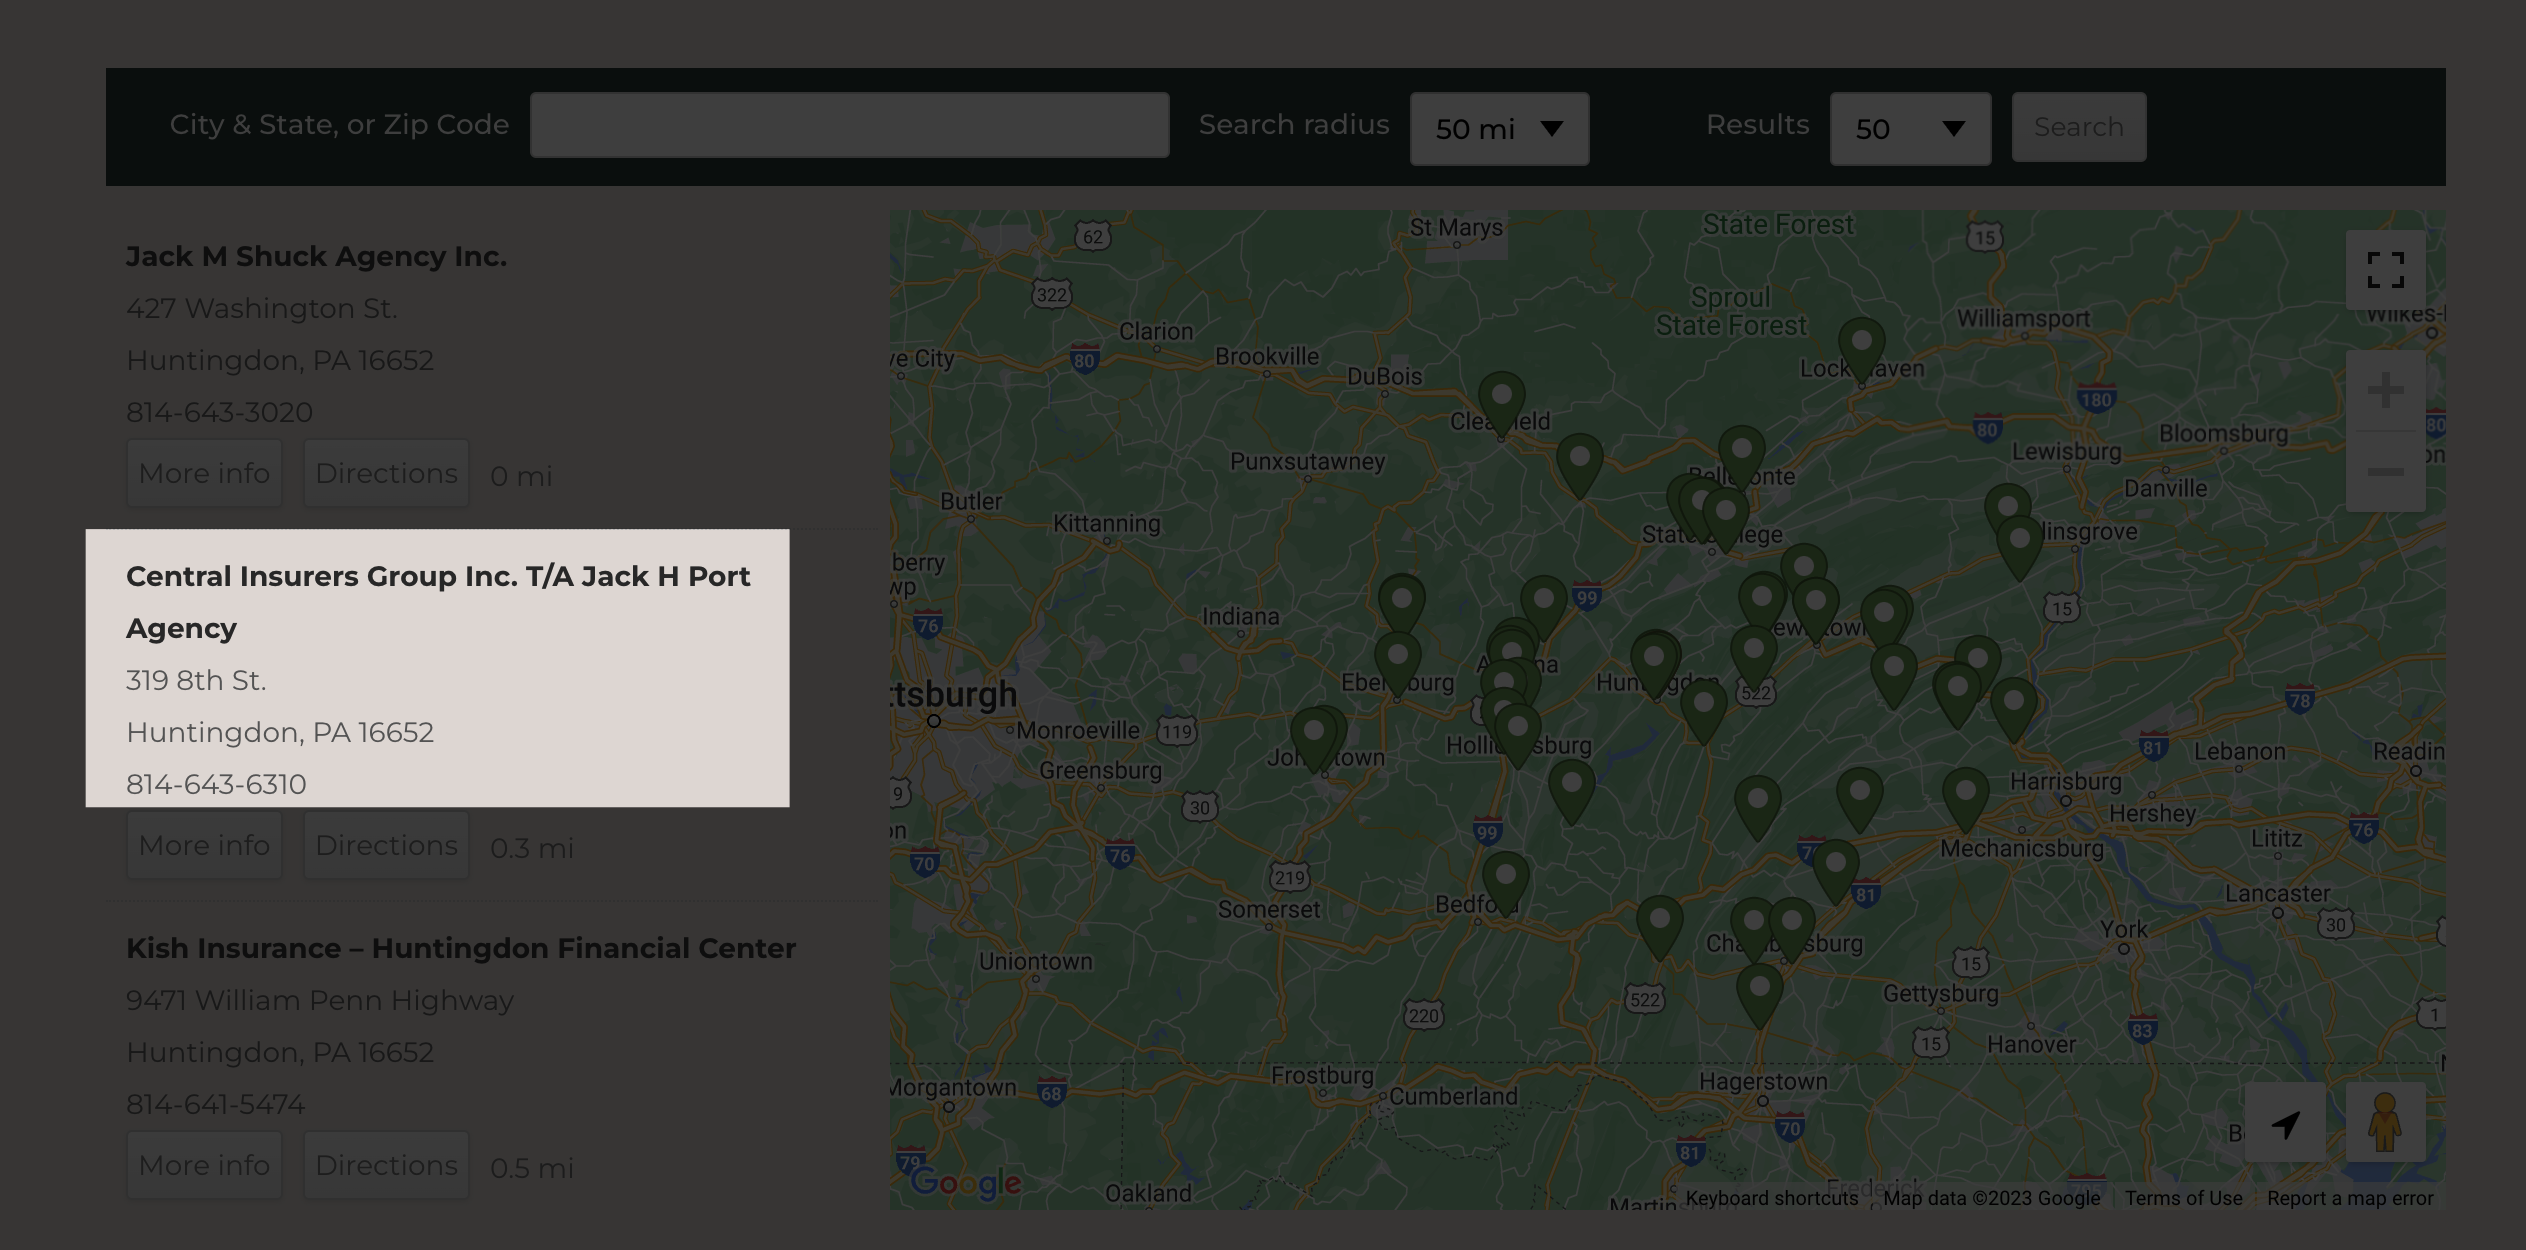
In a selected section for a screenshot, you have the option with iShot Pro to select within your selection so that this portion is highlighted as seen in the above image where the other areas of the screenshot are slightly dimmed out. This allows you to bring attention to an individual area of the screenshot. You have such tools as including arrows or circling important items within the screenshot in different colors as well.

Infinite Capture

Another valuable asset of iShot Pro is the ability to highlight a section and use “scroll screenshot”. This option allows you to take a continuous screenshot of a controlled area within a scroll allowing a “long” picture of an entire page or section. This extended view screenshot can then be highlighted, etc like any other screenshot using iShot Pro.

Pin to Screen

If you need a screenshot to be at the forefront of your screen no matter what tab or view you are on, you can use iShot Pro to pin the screenshot. The image stays within view no matter your navigation throughout your desktop, allowing for easy comparisons between the screenshot and active work. You can even set the image to be more transparent or resize to meet your needs.

As you can see, the iShot Pro is a valuable tool for Mac users at PIC.

Here you can find similar screen capture tools for Windows PC such as Screen Capture Pro with great tutorials like this video on pinning your screenshots!

Introduction to GA4

Category : Knowledge Share

Matt has been working on transitioning PIC clients’ analytics and data from Universal Analytics (UA) to the new Google Analytics 4 (GA4)! With multiple resources available below to familiarize yourself with the changes, Matt also provided some key takeaways from the GA4 introduction.

Tracking Model Change

GA4 switches from “session-based” tracking such as pageviews in UA to “event-based” tracking in GA4. This gives GA4 the ability to track more user interactions out of the box.

Views Are Gone

GA4 operates with only Properties. Streams connect to an individual property to give you “all-in-one” reporting for websites AND mobile apps.

Reporting Interface Understanding

GA4 has far fewer pre-configured, easily-accessible reports than UA. Matt has recreated commonly used UA reports within the GA4 interface for PIC to use.

Resources to learn more!

Article: GA4 vs Universal Analytics
Video: GA4 Course for Beginners (2023)

Abandoned Cart Improvements

Category : Knowledge Share

Recently, Mike was asked to review Rock-N-Rescue & Rock-N-Arbor’s abandoned cart workflow to identify ways to increase conversions. Although we haven’t yet received approval to implement any of these suggestions, these are some of the things we should consider for any eCommerce client.

According to Shopify, the leading cause for cart abandonment during checkout is “extra costs too high” (55% of responders).

Additionally, free delivery (53%) and coupons/discounts (41%) are the incentives that drive the most purchases among online shoppers. So we want to highlight free delivery where possible and offer discounts/coupons in certain situations.

With HubSpot, both of these things can easily be accomplished with smart content.

In HubSpot, discounts/coupons can easily be added to an abandoned cart workflow without needing to create any additional emails or workflows. All we need to do is modify the existing abandoned cart emails. We accomplish this by creating a list of contacts active in the abandoned cart workflow that have a cart total value that’s greater than or equal to the desired amount.

We then add smart rules to the abandoned cart emails for any contacts meeting these requirements. Of course, we can base discounts off of properties other than cart value. I’m just using cart value as an example. If a customer’s cart meets the requirements, smart content will ensure the email’s subject line and body reference a discount.

For HubSpot clients that offer free shipping with a minimum purchase amount (e.g. $100+), we can make our abandoned cart emails more effective by using smart content to let customers know how close they are to free shipping.

If they are below the $100 threshold, we can display a message letting them know they are close to getting free shipping. We could then link back to the website – perhaps to a sale/clearance page – to encourage them to add an additional item to their cart.

To make this as effective as possible, we can also show the customer how close they are to receiving free shipping by creating a custom property that is an equation. If free shipping starts at $100 and their total order value is $87, this property will display $13 as the amount they need to spend to get free shipping.

ISC Health Digest

Category : Knowledge Share

Goal

Provide iNet customers with a valuable report in a format that offers a strong user experience, data security, and insights into our customers success.

HubSpot

Objects
Represent the different types of relationships and processes your business has. All HubSpot accounts use four standard objects: contacts, companies, deals, and tickets. All objects use the same framework, which enables you to segment or report on them. Depending on HubSpot subscription you can have some other objects calls, products, etc. and custom objects.

Record
A single instance of an object, where you can store information in properties and track interactions. You can associate records between objects to understand how they are related.

Properties
The different fields where you can store information on a record. There are default properties included in your account for each object, but you can also create custom properties based on your business needs.

How to create custom objects?

If you’re a super admin in HubSpot, you can create a custom object in your HubSpot settings or via API. You’ll have to define object name, primary property (required), and as many properties as needed.

While creating a property you define the internal name that is used by integrations or APIs and cannot be edited once the object is created.

Tip: it was very useful for us to add a unique identifier, different from hs_record_id, that makes sense to us.

CO structure for Health Digests

For this project we created three custom objects, the first object is “iNet Account”. This object is associated with Contacts default Hubspot object, in a relation of many to many. This means that one contact can be associated with many iNet Accounts and also one iNet Account can be associated with many contacts. Its properties are unique per iNet Account.

The second object is the iNet account Contacts, it is associated with iNet Accounts in a relation of one to many. This means that one iNet Account Contact is related with one iNet Account, but one iNet Account can be related with several iNet Account Contacts. It has kind of two groups of properties, Contact Name, Email and Phone is duplicated information from Contacts object, it needs to be here so we can show that info on public pages or emails. Then it also has the iNet Account Contact properties, those reflect the role of the contact in that iNet Account. One contact can have multiple iNet Account Contacts, each of those would be related to one iNet Account.

As an example, Diego can be associated with iNet Accounts XX and YY and be the default contact of XX and not be de default contact in YY.

Finally, we have Heath Digest object, which contains the information that is monthly reported, here the association is one to many with iNet Account, so each report is related with a single account, but each account can have multiple reports.

Monthly import

We’ve been doing imports since November 2022, but since Jan 2023 the data provided is coming in the following format, which is better than the previous one and we hope we can stick to it.

The data has one row per association between iNet Account, iNet Account Contacts, and Health Digests. So the iNet Account and Health Digest information will be repeated as many times as iNet Account Contacts a report has.

For more on this topic, check out these helpful links:

https://piconsulting.slite.com/app/docs/TUOt92KihHqZch

Results individual report of health digest.

https://www.indsci.com/health-digest/4786960784

Internal report of health digests.

https://www.indsci.com/health-digest-internal-isc?ia_number=51615AD

https://www.indsci.com/health-digest-internal-isc?ia_number=ON51032B

https://www.indsci.com/health-digest-internal-isc?ia_number=54003A

HubSpot Campaigns

Category : Knowledge Share

HubSpot Campaigns

Track complex campaigns with one source of data.
Too often, marketers need to pull customer data from several sources to create targeted and personalized campaigns, resulting in a disjointed and frustrating customer experience. Marketing Hub is the only marketing automation platform built on top of a CRM. Which means not only are all of your campaign tools in one place, but all of your customer data is, too.​

Access real-time campaign reporting.
Marketing and Sales all need to pull static reports from different systems and cobble them together in a spreadsheet to measure impact. This means campaigns aren’t optimized until it’s too late. Equip every team with the power to measure, iterate, and optimize campaigns based on real-time performance insights.

Campaign Assets

Adding assets to a campaign to track can be done in two places

  • In the settings for the asset such as landing pages, social posts, emails and CTAs
  • From the Campaign “ADD ASSETS” button in the campaign planning and reporting section in HubSpot
  • HS will suggest a campaign based on the content you are creating.

It is important to be intentional when creating and choosing campaigns.
Some assets, once a campaign is chosen, do not move data from one campaign to another. For example, once a social post is placed in one campaign. If it is in the wrong campaign, when it is move the data will not move with it and it will result in 2 campaigns reporting incorrectly.

If you are asked to create a CTA, landing page, social posts, etc and do not know where which campaign it belongs in:

  • Ask the AM
  • Add it to no campaign and let the AM know it needs to be selected before publishing

Campaign Applications

Campaigns are useful for organizing and reporting on specific goals and campaigns.

Hero Mission Content Results

  • What traffic and conversions does our HMS efforts result in? This allows us to see all the pieces of the mission work in one place and how they work together.
  • How many leads did this generate?

Promotions or Events

  • Webinars, Sales, seminars, etc
  • Campaigns with specific beginning and end dates.

Clear & easy reporting for clients in real time.
The client can look at their campaign reporting at any time and see watch how their marketing is working for them.

Campaign Do’s and Don’ts

DO

  • Think about how your task fits in the big picture or goal
  • Choose campaigns intentionally
  • Check the campaign setting, especially when cloning assets.
  • Review the campaigns that exist for the appropriate options
  • Ask the AM if and which campaign to use

DON’T

  • Create new campaigns for one asset, workflow, landing page, CTA, etc
  • Randomly choose campaigns, always confirm you are choosing the correct ones
  • Assume the campaign the HS suggests is correct