
POINTS MENTIONED BY BARIS
1. Initial Speed Test
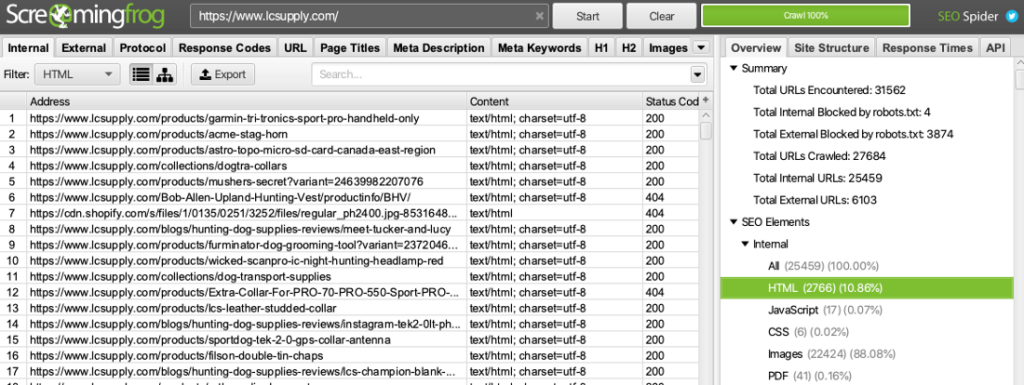
Use a third party service called GTmetrix because it has the most accurate measurements to determine how fast (or slow) your page load. Initial speed test and the final speed test should be done in (more or less) the same environment. For each speed test, run GTmetrix for about 10 times and choose the one that fits to the “weighted average”. For example, if the majority of the tests result in 4.5 seconds but few of them result in 3/3.5 seconds and few of them result in 7-8 seconds, choose 4.5 seconds because that’s how your website performs most of the time.
NOTES : Use GTmetrix’s default settings because the default fully loaded time is not a realistic measurement for your site, as it (hilariously) waits for some extra seconds just in case. Instead, use the stop onload parameter on GTmetrix to measure the onload time.
About the different time measurements:
1) Onload (OL) time represents the time your visitors can fully interact with the website.
2) First contentful paint (FCP) time represents the time your visitors see the content with the appropriate design painted on their screens.
3)Time to first byte (TTFB) represents the time your server first responds to the visitor’s browser.
All three of these metrics above are the ONLY metrics that search engines (like Google and Bing) take into account when they rank your website in search results. Also, a visitor’s brain processes the FCP time as “the page has loaded”, stops releasing cortisol (the stress hormone) and releases a drop of dopamine (the reward hormone).
Some of our clients ask for tests made on Google PageSpeed Insights but we tend to stay away from GPSI, because:
1. GPSI is buggy – Some of the “recommendations” GPSI reveals don’t represent the speed optimization work applied to the website. The ones we see the most are “defer offscreen images” (even while lazy loading is active) and “defer unused CSS” (even while critical CSS optimization is applied).
2. GPSI is a bit funny because it sometimes recommends to optimize third party code, which are hosted on third party servers, including Google’s own servers. Seriously, we love it when Google recommends to optimize Google Analytics or YouTube.
3. GPSI may point to the wrong direction: GPSI tends to condition people to care for the scores, instead of time-based measurements which actually matter (the ones we’ve covered above). Those GPSI scores don’t necessarily reflect the speed of your website – an empty error page might get 100% while an actual page loading under 1 second can get 30%.
NOTE : Whether it be GPSI or even GTmetrix that we use, keep in mind that scores NEVER matter, neither in the eyes of your visitors nor the search engines (including Google).
I’ve got five articles for you to read more about this topic, if you’re interested:
- Why you Shouldn’t Care About Google PageSpeed Insights
- PageSpeed and YSlow are Half the Battle
- Overlooked Speed Factors That Impact Google Rankings
- How Page Speed Affects Search Engine Rank and What You Can Do About It
- Google PageSpeed Insights: The Truth About Scoring 100%
2. START with Pre-Optimization Report
This report will covers all the steps such as:
a) Changing theme settings.
b) Changing plugin settings.
c) Deactivating (not deleting) unnecessary plugins.
d) Replacing slow plugins with faster & better alternatives.
e) Light updates to certain content.
f) Removing unnecessary third-party scripts and styles.
g) Changing certain server settings (like PHP version) if necessary.
h) (On very special occasions) A server migration, only if crucial.
i) Integration to CloudFlare or Sucuri, if necessary.
3. Plugins that can be used to Speed Up Your Website
a) Autoptimize: Use this awesome plugin to gather all your CSS and JS files, combine and compress them and serve as few assets as possible. (The most important part of this plugin is the exclusion rules because if you don’t set up exclusions the right way, you might break your website!) Along with combining & compressing CSS/JS files, optimize Google Fonts, and remove some unnecessary scripts altogether. Try using the CriticalCSS feature, you need to sign up with criticalcss.com (using the WordPress option) .
b) WP Rocket: WP Rocket is premium caching solution, giving your money’s worth to the last cent. It has more features than caching and we’re going to use a lot of them, except for CSS/JS compression because Autoptimize does it better than WP Rocket.
c) ShortPixel: Optimize the images with ShortPixel Image Optimizer. It’s a great plugin, has fantastic compression rates (usually around 60%) and its credits are really cheap – you can even get 50% more credits for the same price if you sign up with my affiliate link here. Signing up is free, and you pay for the package you want afterwards.